How to Fix Core Web Vitals Assessment Failed in WordPress?
This post will show how to fix the Core Web Vitals Assessment Failed in WordPress sites. Our guide has a proven framework to improve Core Web Vitals in WordPress.
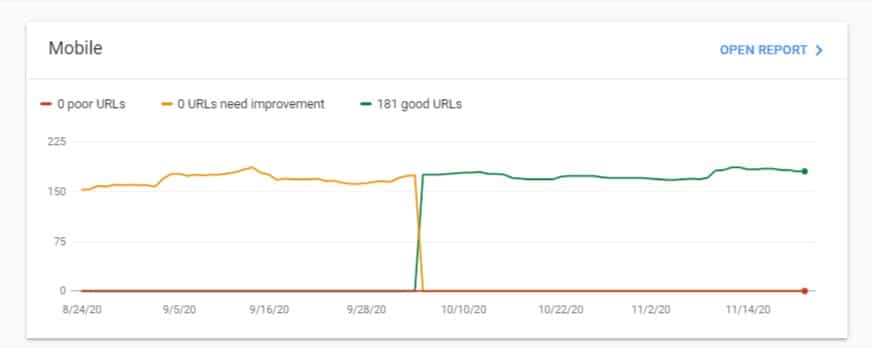
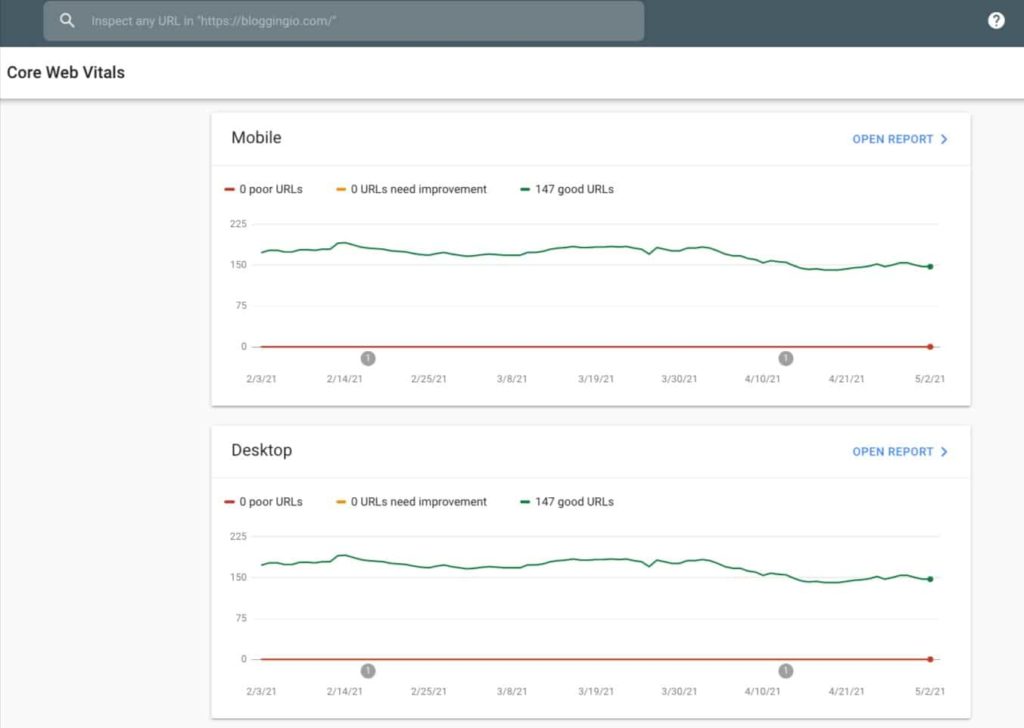
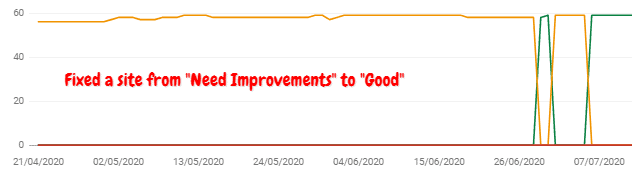
Since its launch, I have been optimizing for Core Web Vitals, and all our sites passed the Core Web Vitals assessment test. Here are some of our sample works from Google Search console user experience data:
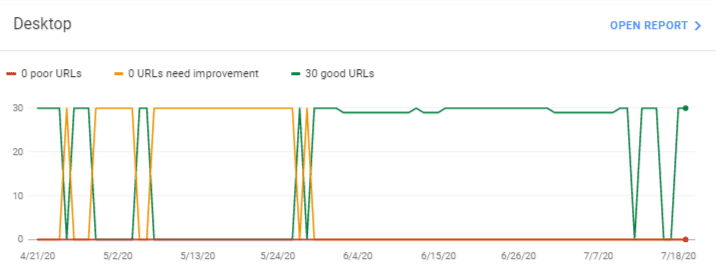
Our Core Web Vitals Assessment has passed on sites even with using page builders like Elementor, Divi Builder, etc. The simple-to-follow, non-developer-friendly guide is coming up on how to fix the failed Core Web Vitals Assessment for your sites.
Quick Summary:
1. Use WordPress hosting with the fastest TTFB. This can fix major Core Web Vital issues.
2. Use Perfmatters to fix “Remove CSS & JS,” “Delay JavaScript,” and 25+ speed optimizations to improve your site speed.
BONUS: Use NitroPack.io to automatically pass the Core Web Vitals assessment Failed issue. None of the manual optimizations are required. NitroPack will take care of everything. There is a free plan available.
How to Fix Core Web Vitals Assessment failed WordPress
If your site is showing as Core Web Vitals Assessment Failed, then you need to improve the Core Web Vitals metrics like
- Largest Contentful Paint (LCP),
- Interaction to Next Paint (INP), and
- Cumulative Layout Shift (CLS).
Let’s see how to improve each of the metrics.
1. Reduce Time to First Byte (TTFB)
By reducing your site’s Time to First Byte (TTFB), you can significantly improve the Largest Contentful Paint (LCP), which leads to the Core Web Vitals Assessment Passed.’
Sounds simple, right? Reducing TTFB is the most logical and straightforward way site owners can do to improve the LCP metrics.
If you closely look into your PageSpeed Insights report, you will see the Time to First Byte (TTFB) under “Other Notable Metrics.”
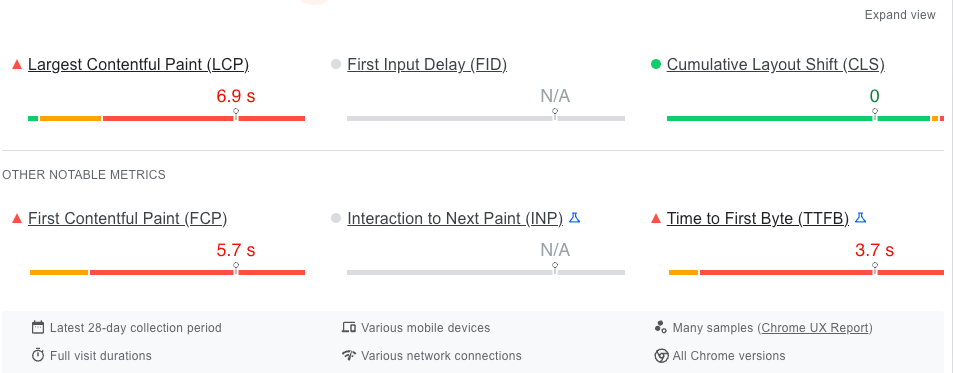
Google recommends TTFB should be less than 0.8 seconds, and if it’s above 0.8 seconds (or 800ms), then your TTFB score is an issue. This high TTFB primarily impacts your LCP score, eventually leading to a failed Core Web Vitals score.
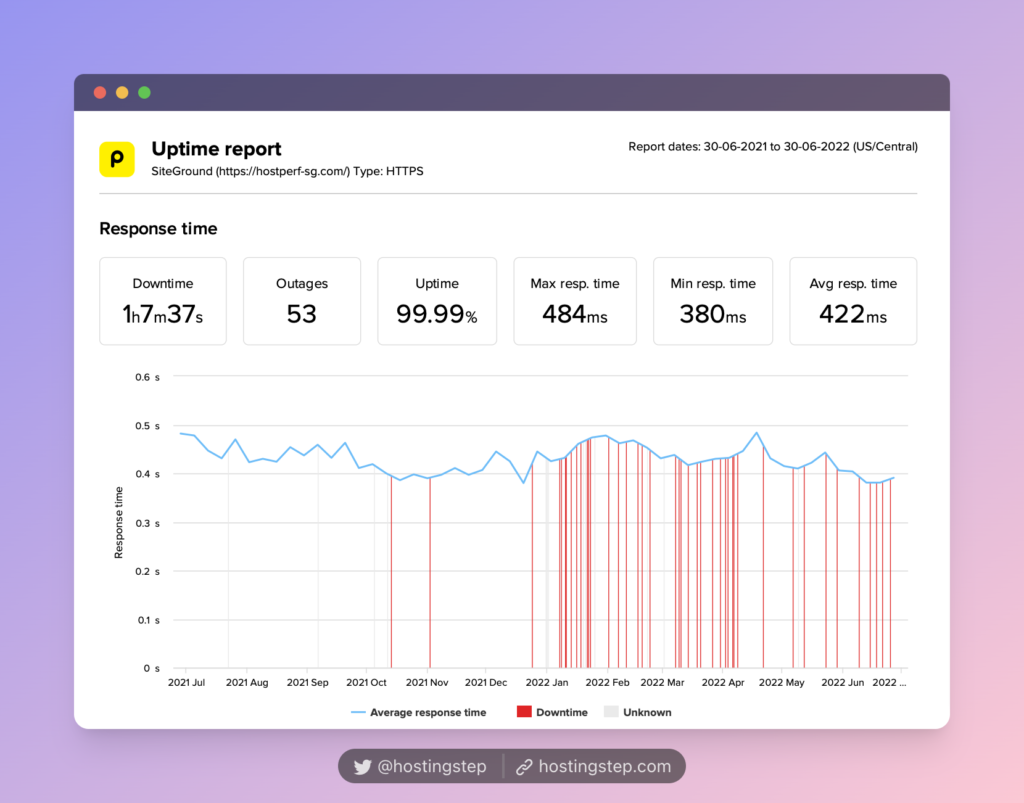
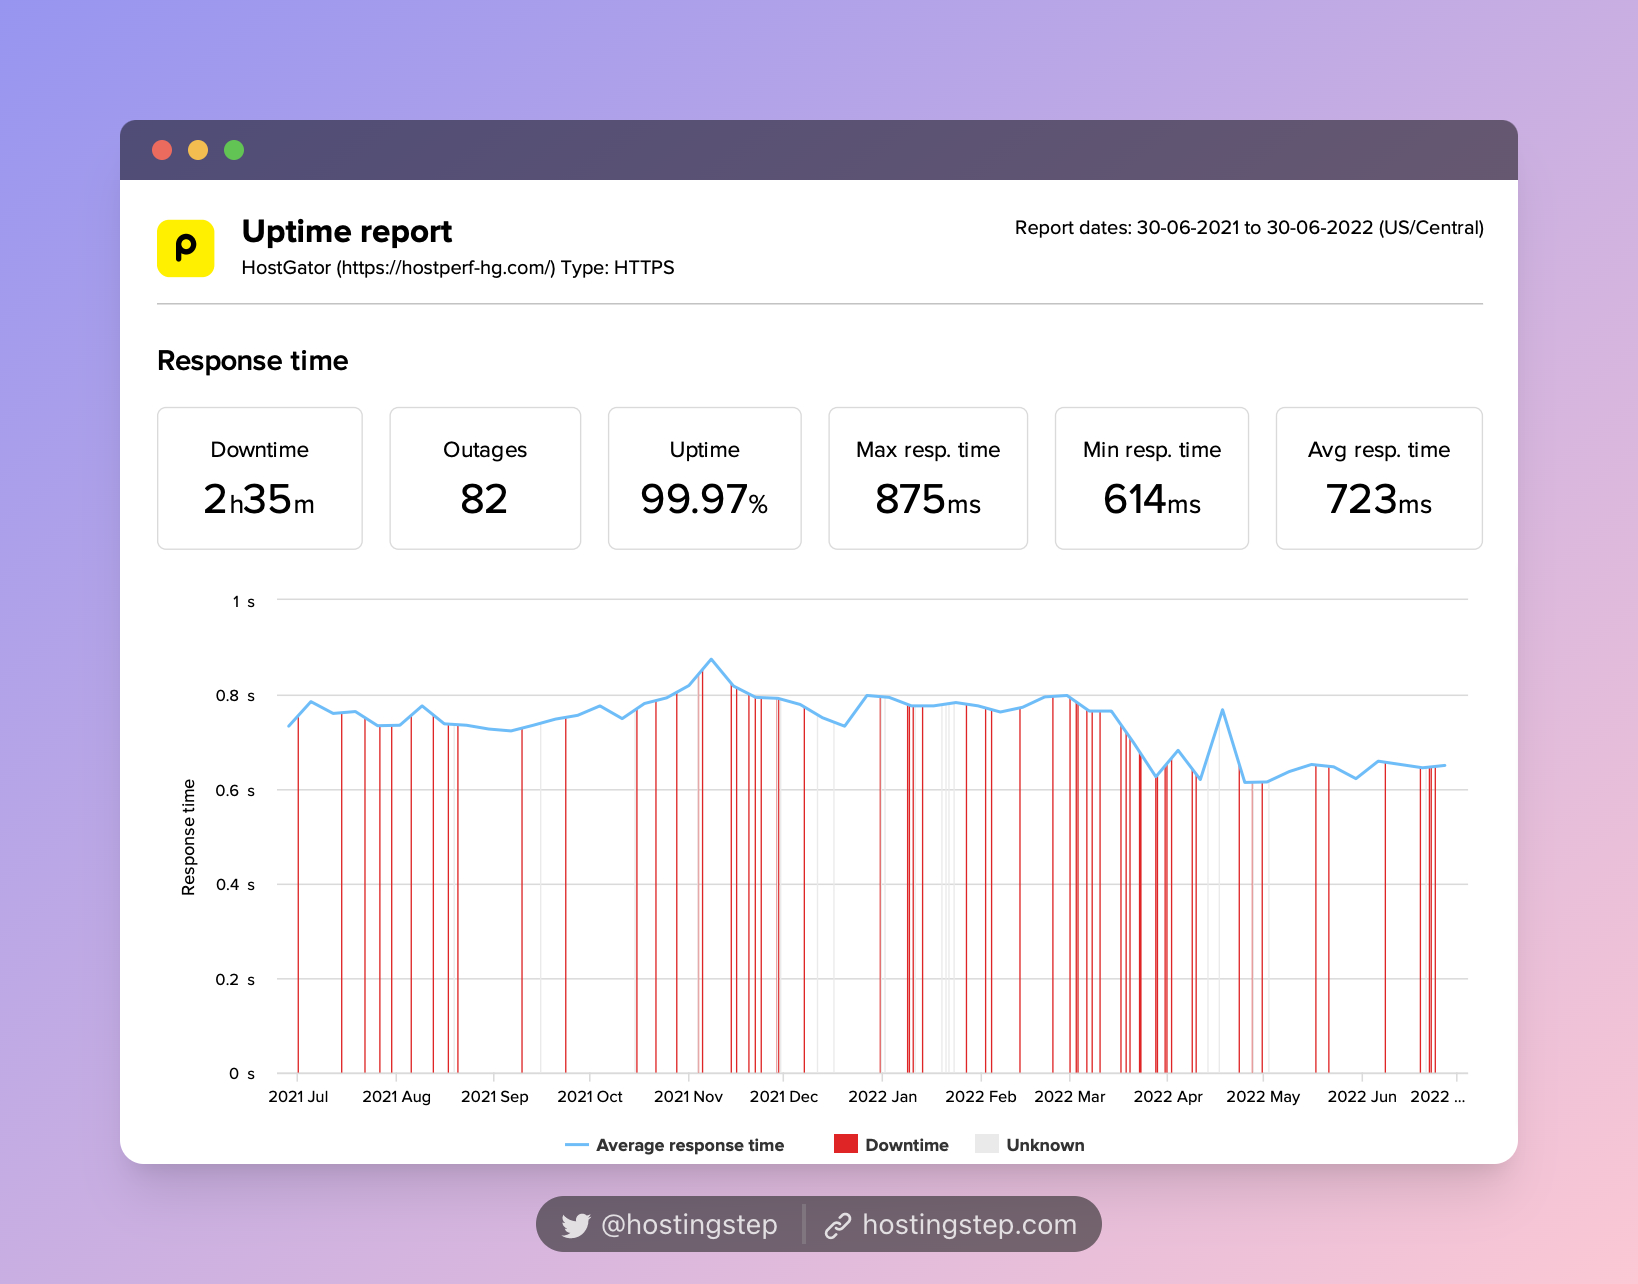
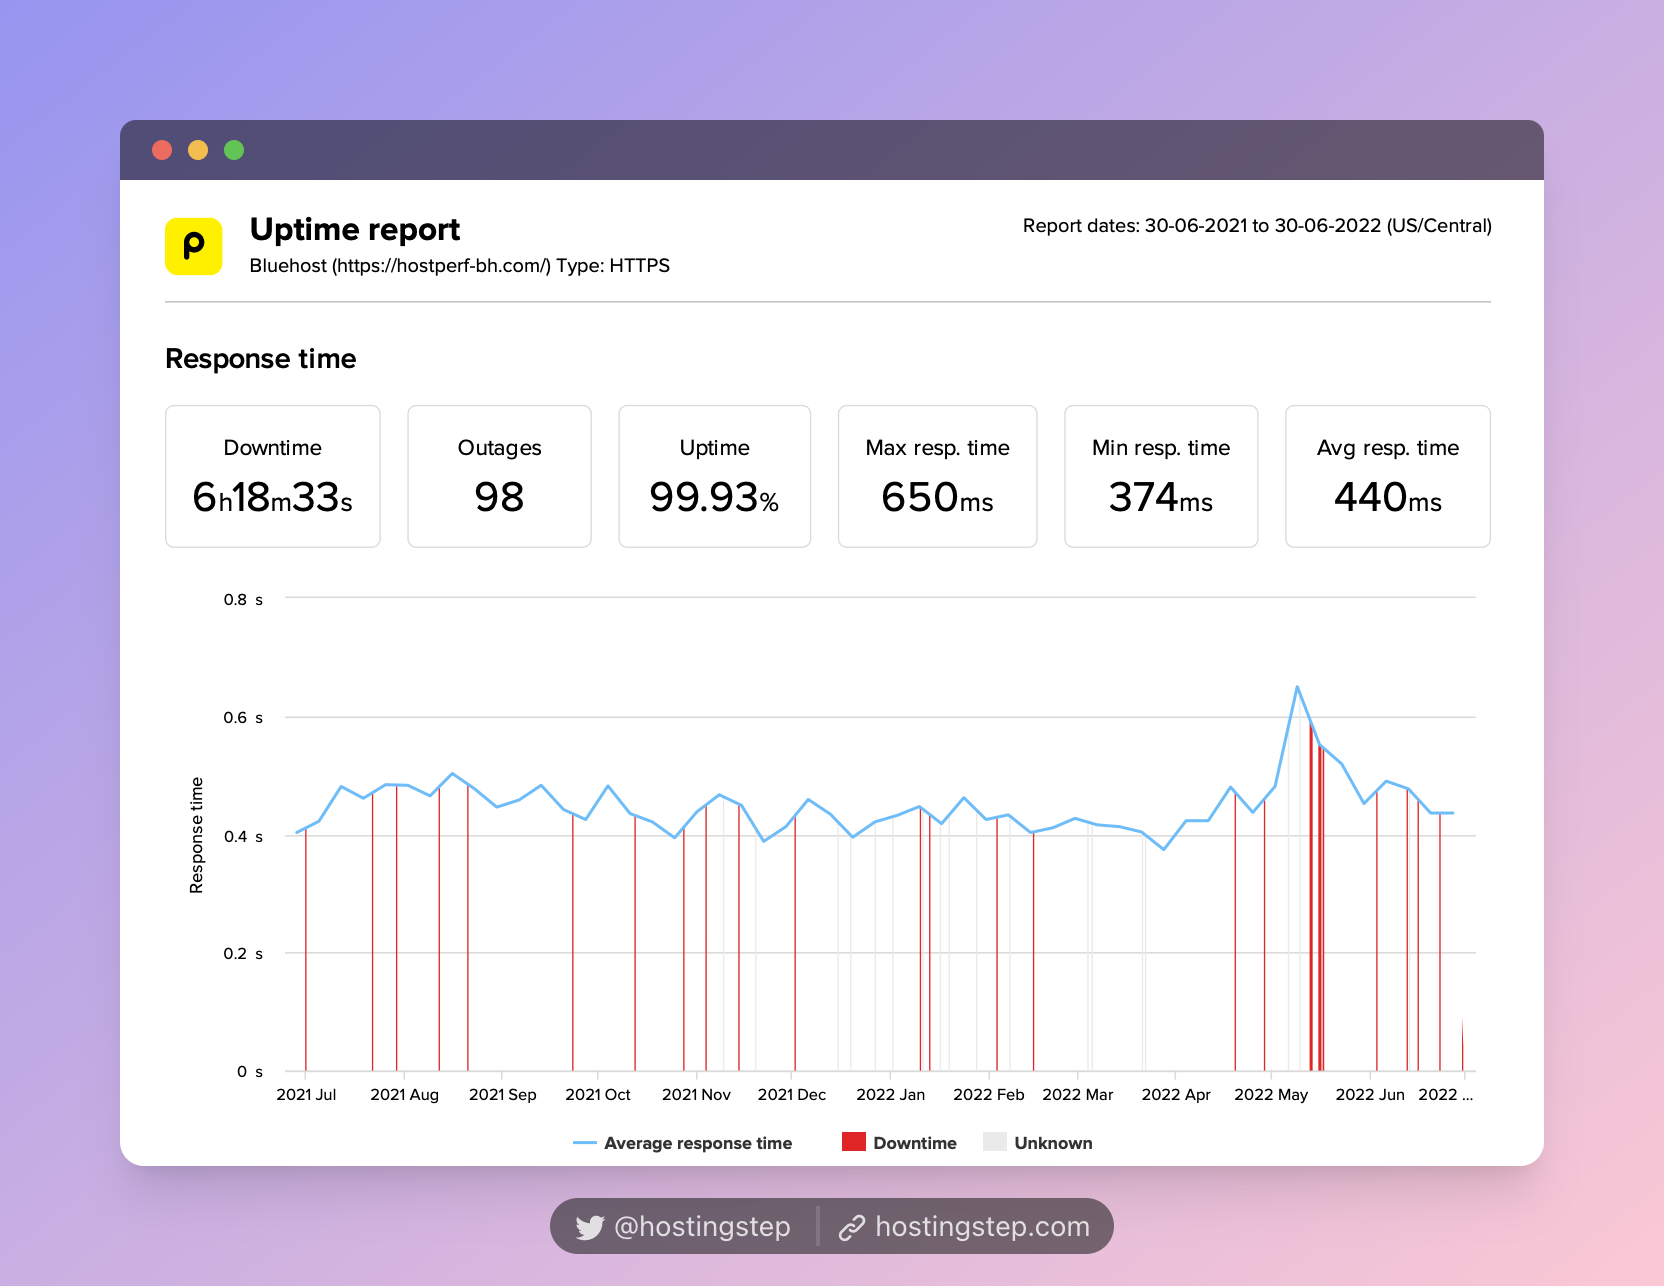
Based on our field-tested 12-month data, HostGator, Bluehost, and SiteGround are the poorest hosts with the slowest TTFB.
- HostGator – 723ms
- Bluehost – 440ms
- SiteGround – 422ms
The slowest hosting (HostGator, Bluehost, and SiteGround):


I wrote a lot of premium optimization methods below to fix the Core Web Vitals assessment failed issue, but to make sure they work, you need to have a strong base, i.e., the fastest hosting provider.
2. Use the Fastest CDN with Edge Caching
Using a Content Delivery Network (CDN) significantly improves your TTFB and helps to fix the Core Web Vitals Assessment Failed Score.
Google recommends using CDN to enhance the performance of your sites. But as per my work experience, one should choose a CDN that offers Edge caching.
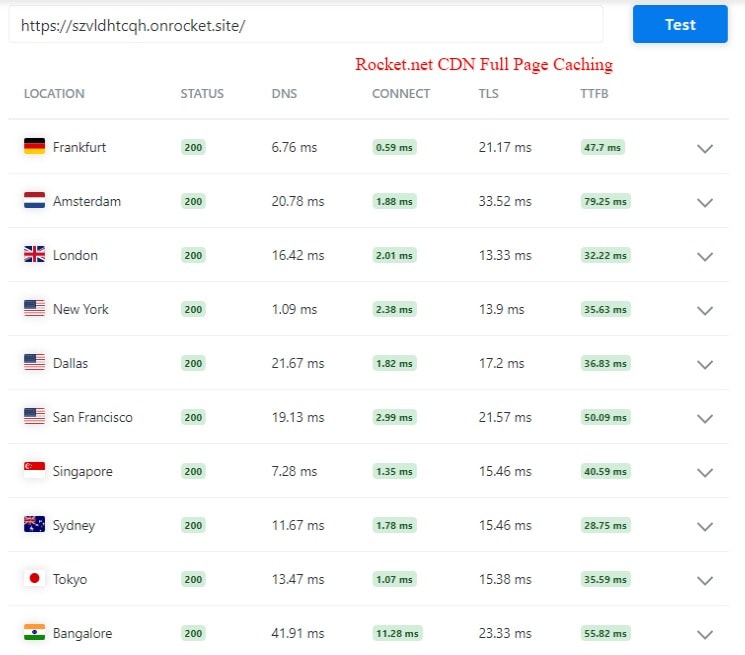
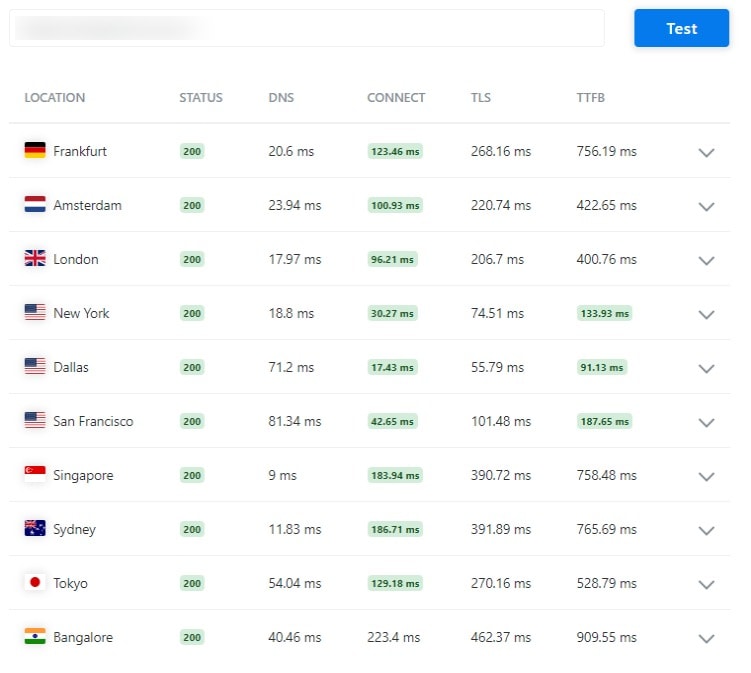
For your understanding, I’ve compared a site with CDN full-page caching and another site with traditional CDN.
The site with CDN Edge caching has a lower TTFB ranging from 30ms-60ms. The other site with a regular CDN setup has a higher TTFB range from 90ms – 910ms.
To cut short technical things, I reviewed each CDN available in the market with an easy Edge caching setup.
- Google Cloud CDN – Fastest CDN in the world. But available through Templ hosting with Full Page Edge caching. The plan starts from $15/month. I use Templ hosting for my sites.
- Cloudflare Free – Not recommended. As a free user, Cloudflare delivers your content from selected POPs (Edge server locations), and they don’t offer you all of their 200+ global edge locations. Due to this, your TTFB will be even higher.
- Cloudflare APO or Pro or Higher – Recommended. It starts from $20/month. Get better results when Full Page Caching is activated. This hosting offers Cloudflare Enterprise with Edge caching.
The other reliable CDNs are AWS Cloudfront and BunnyCDN, but there is no ready-made solution to use them with Edge caching on WordPress sites. You need to configure them manually, so I’m not recommending them as the first choice.
Considering you’re using one of the CDNs, make sure to enable full-page Edge caching and see your TTFB improve magically along with the Largest Contentful Paint score which eventually fixes Core Web Assessments Failed.
3. Eliminate render-blocking resources CSS and JS
Every active WordPress plugin on your site loads many CSS and JS files at the backend. These CSS and JS files block the first paint of your page.
In simple terms, the first paint is the first visible text or elements like images that load from your page.
Since the CSS and JS resources block the rendering of the page, the Largest Contentful Paint score will be higher. To fix this, one needs to eliminate the render-blocking resources first.
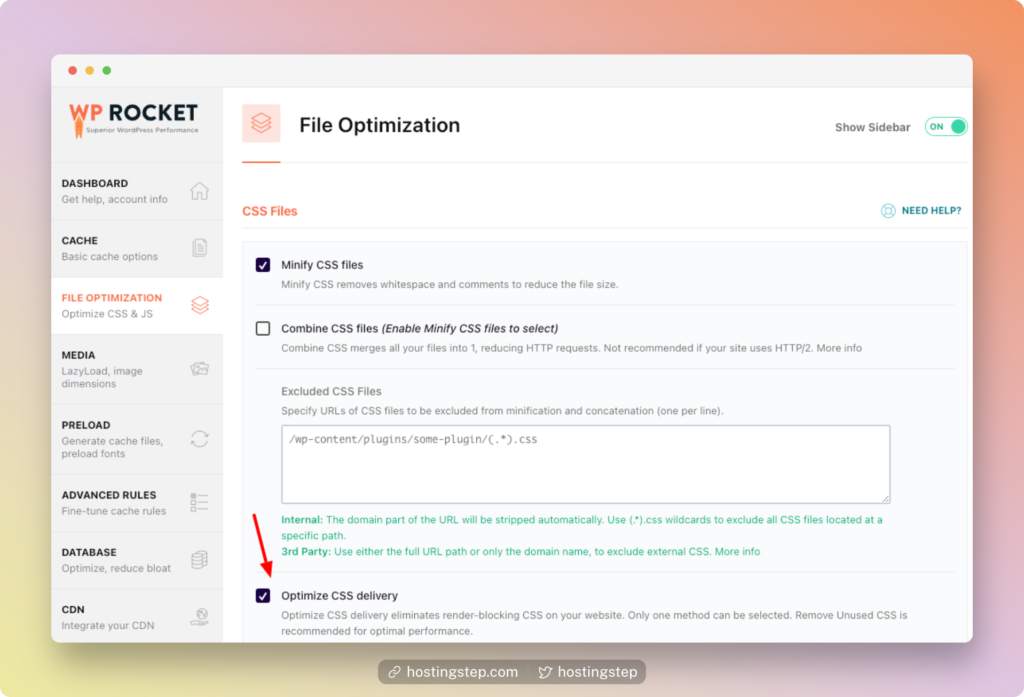
For this guide, I’m considering the WP Rocket plugin as it eliminates the render-blocking CSS and JS with one click.

The Autoptimize and Async JavaScript are two free plugins to fix this issue (Kinsta wrote a detailed guide on using free plugins here)
Test your site after enabling the option, as there might be chances your site might break down.
4. Remove unused CSS and JS files.
This is my favorite way of speeding up the site in a jiff.
Let’s say you’re using a plugin like Contact Form 7 to create a contact form, and you most probably placed the form on your contact page.
However, the plugin loads many CSS and JS files on every site page.
Likewise, every active WordPress plugin loads enormous files on all pages. These files affect the page load time and cause a slowdown.
First, you need to find the unused CSS and JS files to fix this.
There are two ways to find it.
Check the Network tab on your Chrome browser (Right click on your page -> Inspect -> Network). Now reload the page, and the browser will show you the list of all files.
In the below example, the contact form scripts of Formidable Forms and Caldera forms are loading on the home page, though there are no forms on the homepage.

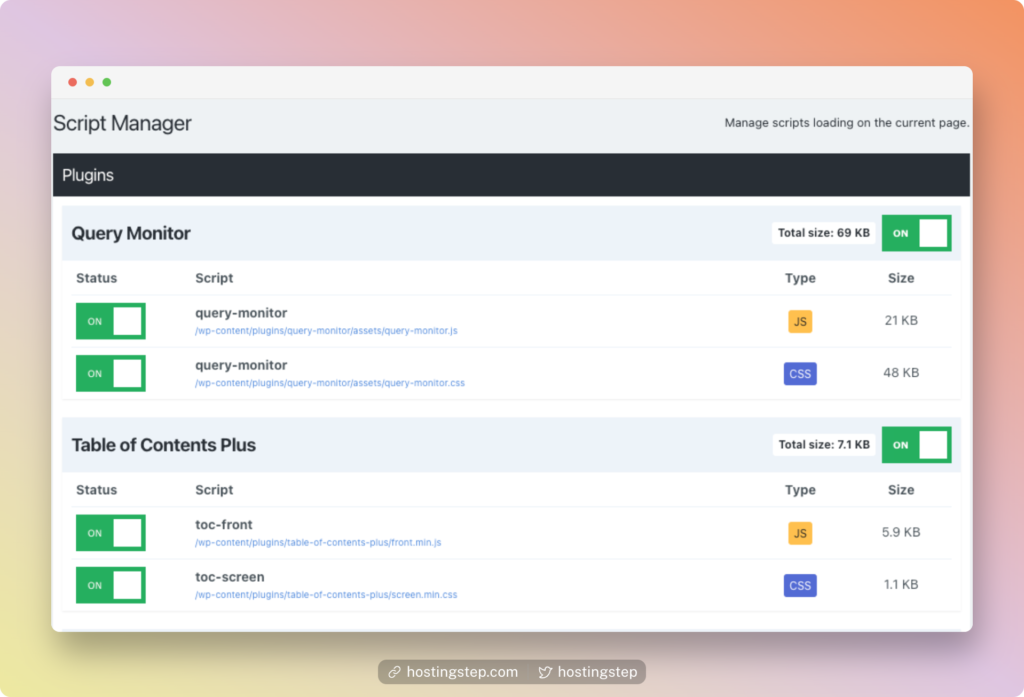
Now remove the unwanted scripts using Perfmatters (the Premium plugin I use) or Asset Cleanup (free version).
With Perfmatters, click on the “Script Manager” from the Top Admin Menu bar. Now, you will have a screen like this where you can disable unwanted scripts.
If you’re using Asset Cleanup, you can find the disable option at the bottom of the post editor page.
5. Delay JS files for more remarkable speed improvement
The Delay JavaScript execution is one of the latest techniques to improve page performance. You can delay most JS files associated with your site.
How does this work? The plugins delay the JavaScript loading at the beginning and load only during user interaction, like clicking a button, Google Analytics script, Facebook pixels, scrolling the page, etc.
By doing so, the resource-hungry JS files will load only when needed.
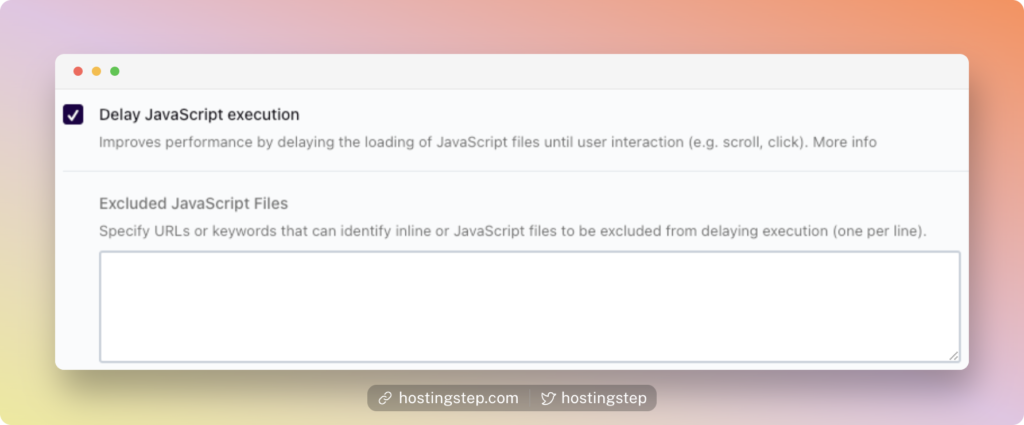
At WP Rocket, they automatically find the scripts that can be delayed. Enable this option; you can see impressive page load times at the PageSpeed Insights tool. You can also exclude JS that you don’t want to delay.
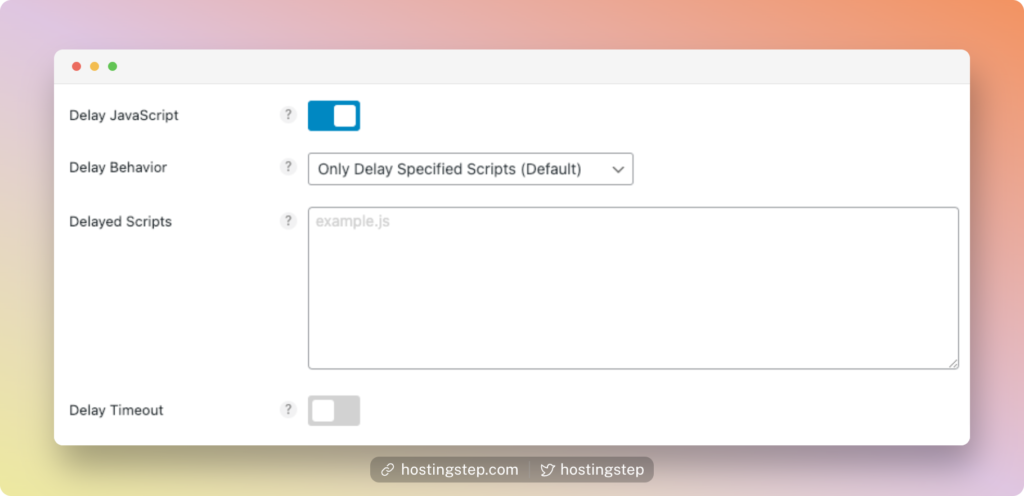
At PerfMatters, enable the option “Delay JavaScript” to delay all JS or only delay specified scripts.
If you choose the latter option, enter the delay scripts in the box. You can find the JS scripts using GTMetrix waterfall or your network tab.
6. Prefetch DNS Request
The DNS Prefetching improves the Core Web Vitals by prefetching the external files to load faster. According to WP Rocket, this technique benefits users on mobile networks with unreliable connections.
Click the “Preload” tab on WP Rocket and enter the URLs to prefetch. Use the Network tab or GTMetrix waterfall tab to find your site’s list of external URLs.
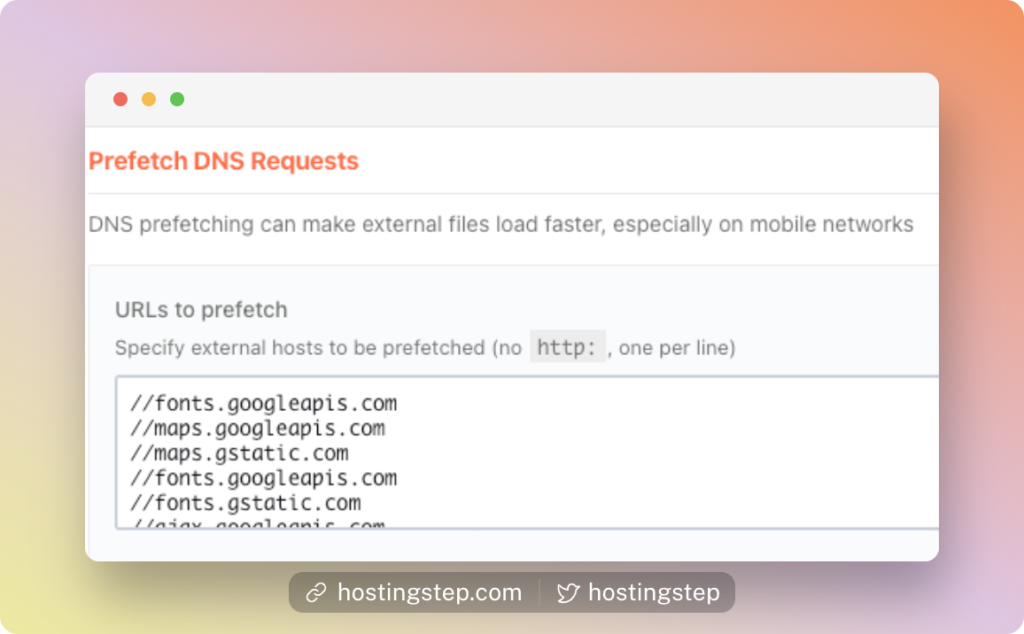
The most common things that can be Prefetched are Google Fonts, CDN subdomain URLs, Google Analytics or Tag Manager, etc.
7. LazyLoad Images, iframes, and Videos
Images are an integral part of any site. But they are also the reason for the high load time due to its large file size.
Lazy Loading images, iframes, and Video is one of the most common practices to improve the load times. This helps to greatly improve the google Core Web Vitals.
As I’m using WP Rocket and PerfMatters, here are the options one should enable.
Once the lazyload is active, the images or videos will load only when the user visits the image viewport area. This reduces the number of HTTP requests, and there are a lot of free and premium plugins to do it.
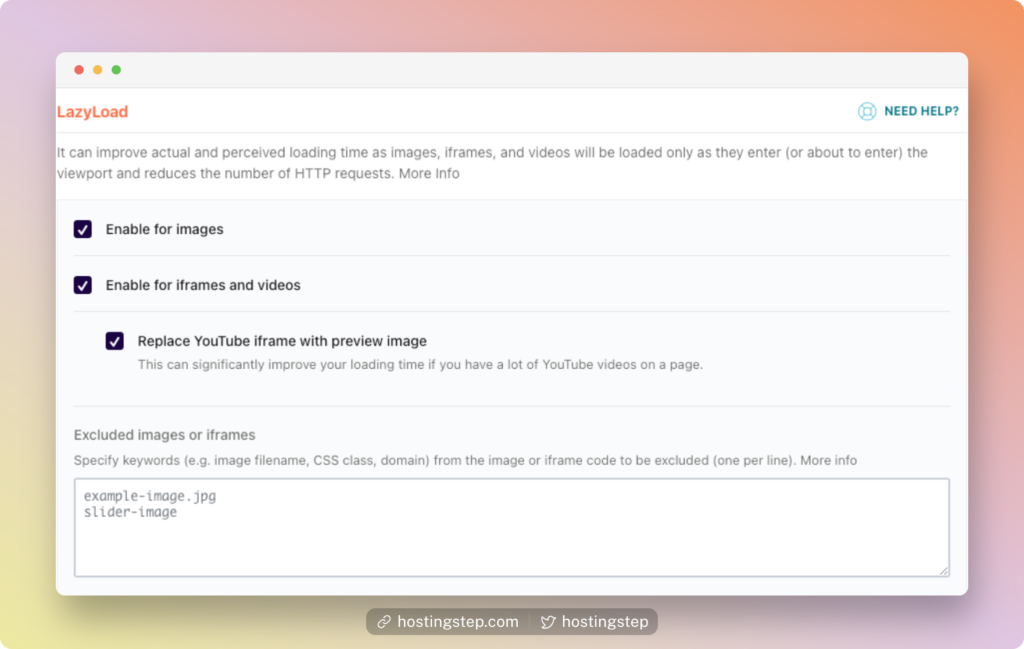
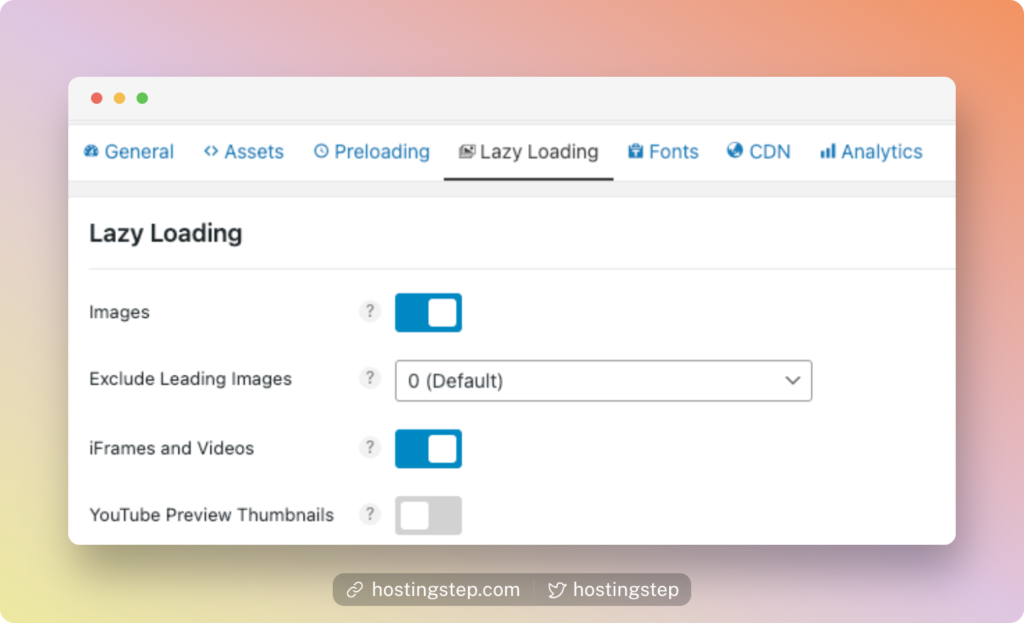
PRO TIP: Use image compression like ShortPixel (free) or Imagify (premium) to compress the images automatically while uploading to the site. This compression, along with lazy Loading, gives you a better result.
8. Fix Cumulative Layout Shift
The most common causes of poor Cumulative Layout Shifts are images.
Perfmatters explained this issue perfectly.
“Most browsers set a default aspect ratio of images based on their width and height attributes. When the images are missing these attributes from your site, it causes the layout shifts, which causes the CLS warnings.”
To fix these things, you need to add the width and height of the image elements present on your site.
At Perfmatters, click the Lazy Loading tab and enable the option “Add Missing Image Dimensions.” Now you can check the site in Page Speed Insights, and your CLS should get fixed.
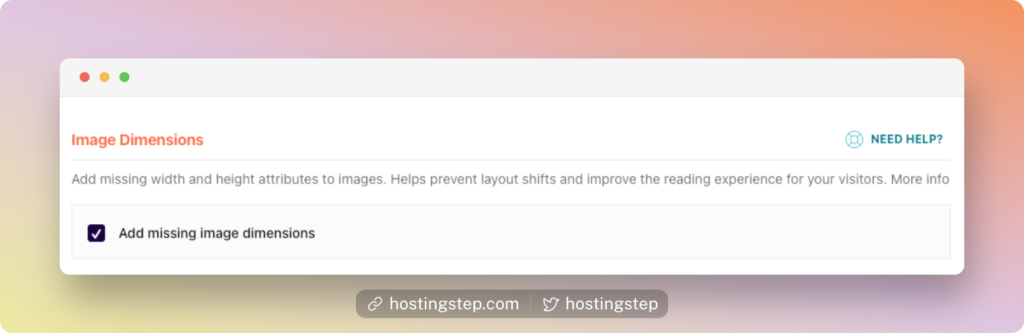
One should also practice the same method and add dimensions to Ads, embeds, and iframes to fix the CLS.
9. Use Perfmatters or WP Rocket
You can use a free caching plugin like WP Fastest Cache and include Perfmatters for speed optimization.
If not, use WP Rocket and Perfmatters for the best experience.
I use both of these plugins on all my sites. Perfmatters has over 15+ optimization options that can magically improve the page load time. However, it doesn’t have caching features.
On the other hand, WP Rocket has both caching and speed optimization solutions for your sites. Find a suitable option based on your budget and make your Core Web Vitals Assessment: Passed.